Recipes Categories

Entries in Breads (14)

Thursday
Jun112009

Whole wheat english muffins

A number of people have requested our english muffin recipe, so here it is. For those who wish to try it I feel I should warn you in advance that these won't cook up like the store bought english muffins we are used to. I should say probably won't, of course, since maybe you know the factory secret, though personally I like the charm of a homemade muffin being what it is. Specifically, my muffins have never had that spongy, airy center that is the hallmark of the factory brands, which may be the consequence of the whole wheat flour, or possibly the lack of factory installed steam infusion ovens. Regardless, we won't be returning to factory made muffins.

Whole wheat english muffins

• 1 cup milk, warmed until just barely bubbling
• 2 tbsp honey (I hear granulated sugar works, too)
• 2 1/2 tsp active dry yeast ( or 1 pkg)
• 1 cup warm water , (105-115 degrees Fahrenheit)
• 1/4 cup melted butter or oil
• 5-6 cups flour (I use 2 cups white, 3-4 cups whole wheat)
• 1 tsp salt

1. Dissolve the yeast in the warm water (105-115 F) and let stand until creamy, about 10 minutes. Combine warmed milk and honey in the bowl of a stand mixer and stir until dissolved.

2. Combine warmed milk and honey in the bowl of the stand mixer and stir until dissolved, then add butter or oil, three cups of flour, salt, and the yeast mixture. Attach the dough hook and beat at a low speed (I use speed 2) until mostly smooth. Add remaining flour by the half-cup until a soft dough forms.

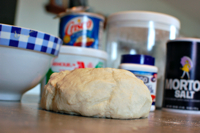
The dough has the right amount of flour when it pulls into a ball and cleans the sides of the bowl. Be careful not to add too much flour, as that will result in very dry muffins. I usually use 2 cups of white and 3-3.5 cups of whole wheat.

3. Remove the dough to an oiled mixing bowl, turn to coat with oil, cover and let rise (in a warm area free from drafts) until doubled, about an hour.

4. Sprinkle a work surface lightly with flour and cookie sheets or bread board with corn meal. Punch down the dough and move to the floured surface. Cut the dough into 12-14 pieces. Roll each piece into a ball and place on the corn meal, leaving 3 inches between the muffins. Press each ball down gently, then sprinkle tops with corn meal. Cover and let rise 30 minutes.

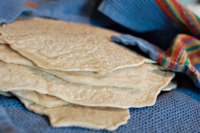
5. Heat a greased griddle over medium-low heat. Place muffins on griddle and press once gently with turner, then cook until they turn a deep golden brown, 5 to 7 minutes on each side. Cool on wire racks (but be sure to eat one right off the griddle, spread with butter or jam, or both!)

Notes - Cook them slowly so that the center cooks up before the outside darkens.  You can use any combination of white and whole wheat flour.  The more white flour you use, the moister the muffins will be.  When I started with this recipe I used 1 cup white and 4-5 cups whole wheat, but as I work with it I'm finding I like them better with 2 cups of white flour.

I'll come back with pictures when I have them (after I make our new batch next week)

Wednesday
May062009

Feliz cinco de mayo!

Well, today is the 6th, but yesterday we celebrated Mexican heritage the best way we know how - with margaritas and fajitas! And chips, salsa, and guacamole, too. Here are some of the recipes we used:


Flour tortillas

  • 3 cups unbleached flour
    2 tsp. baking powder
    1 tsp. salt
    4-6 tbsp vegetable shortening or lard, For a lower fat version use 4 Tbsp lowfat margarine
    ~1.25 cups warm water

Mix dry ingredients in a large bowl, then cut in the shortening/lard/margarine (I used a combination of half lard, half shortening). Next add the warm water a little at a time until your dough is soft but not sticky.
Knead the dough for a few minutes, then form 12 small dough balls and let them rest for at least 10 minutes.
Heat a cast iron pan (I used our griddle) over medium high heat - you'll want it evenly hot before you cook the tortillas. Roll out the dough with a rolling pin (a pelote would be more authentic), adding flour when needed to keep it from sticking, and lifting and flipping every so often. Roll them out to very thin - that's the best way I can describe this - then lay them, one at a time, on the hot griddle, waiting only seconds before flipping, and again before removing. They are ready when flecks of brown begin to appear on the tops of bubbles. Wrap in a towel to keep warm and moist and serve warm. Reheat in oven if necessary. Yum!


To make tortilla chips I made a second batch of tortillas, then cut them into wedges and lay them out on a cookie sheet, sprinkled with salt and cumin, then baked at 350 for about 5 minutes per side (total 10 minutes per batch). Yum again!


Guacamole in our house is merely mashed avocados mixed with a dash of garlic, a pinch of salt, and the juice of about half a lime.


Grilled Chicken Fajitas

  • 1.5 lbs. chicken breasts, rinsed and trimmed of fat
    3 Limes - juiced
    2 tbsp. Worcestershire sauce
    1 tbsp. vinegar (white wine or apple cider)
    2 tbsp. olive oil
    1 tsp. oregano
    1/2 tsp. coarsely ground black pepper
    1/2 tsp. salt

Combine lime juice, vinegar, Worcestershire sauce, oil, oregano, pepper and salt in a glass bowl. Add chicken and marinate, covered, for 2 hours, turning twice.
Remove from marinade and grill over hot coals, 4 inches from the heat for about 12-15 minutes, turning once and basting with marinade until chicken is cooked through. Do not over cook.
Remove chicken to a cutting board and allow to stand for ~5 minutes before slicing into strips.

In our house we top fajita with guacamole, sour cream, tomatoes, fresh cilantro and/or salsa, and a mixture of cheeses. Yum yum yum!


And last, but very definitely not least, Traditional Margaritas!

• 3 tbsp. tequila
• 1 1/2 tbsp. triple sec
• 1 1/2 tbsp. freshly squeezed lime juice
• dash of sugar
• Ice, lime wedge, and salt

This is pretty straight forward, but here are some tips:  to more efficiently extract juice from a lime, heat it for about 10 seconds in the microwave before cutting and squeezing.  To dissolve the sugar add it to the lime juice while it is still a tad warm - if it isn't a tad warm and the sugar won't dissolve, microwave it for a few second then stir.  Use a lime wedge to moisten the edge of the glass then tip it upside down in a plate of Kosher salt to coat the rim.  Coat the rim before filling the glass, of course - if you've mixed up those two steps you've probably had too many already!

Tuesday
Mar172009

Irish Soda Bread

We tried this tonight to go with our Irish boiled dinner. The bread is definitely yummy - not overly sweet but definitely belonging to the sweet bread category - but we had some problems with the recipe as it is written, so I'll give you the recipe as I found it (on www.elise.com) and also tell you where it didn't work.

• 4 to 4 1/2 cups flour
• 2 Tbsp sugar
• 1 tsp. salt
• 1 tsp. baking soda
• 4 Tbsp butter
• 1 cup raisins
• 1 egg, lightly beaten
• 2 cups buttermilk

Add 4 cups of flour, sugar, salt, and baking soda to a large mixing bowl and mix well. Using a pastry cutter work butter into flour mixture until it resembles coarse meal, then stir in raisins. Make a well in the center of the flour mixture. Add beaten egg and buttermilk and mix until dough is too stiff to stir. Dust hands with a little flour, then gently knead dough in the bowl just long enough to form a rough ball. If the dough is too sticky to work with, add in some more flour. Do not overknead! Transfer dough to a lightly floured surface and shape into a round loaf.

Even with the alloted amount of flour I could not get this to be anything but a gelatinous mess. I think I finally added an additional cup of flour (total 5 cups, so only 1/2 cup more than the max called for).

Transfer dough to a lightly greased baking sheet and score top of dough about 1/2'' deep in an "X" shape. Transfer to oven and bake until bread is golden and bottom sounds hollow when tapped with a knife, about 35-45 minutes. Check for doneness also via toothpick method.

At 50 minutes my bread was still raw at the center - completely raw - but it was browning on the outside, so I covered it in tinfoil and cooked it an additional 20 minutes (totalling 1hr 10min) before it was ready to come out.

Remove from oven and cool on wire rack. Serve bread warm, at room temperature, or toasted with butter. This we had no problem with. Yummy!


Monday
Sep222008

Homemade pizza

Over the past few months we have grown increasingly wary of processed foods.  Not only are many of these products higher in all those things we are trying to avoid, such as calories, fats, and sodium, but many of them also come with extra packaging (hard on the landfills and, until we know more about BPA, possilby harder on your health), relatively high price tags, and a greater exposure to unwanted additives.  One of our personal goals for this winter is to significantly cut down on the amount of processed foods that we consume.  Tonight's foray into homemade food territory found us making pizza...from the crust up. 

Having never made bread of any kind without the help of our handy little machine I wasn't sure how this experiment would go over, but I'd have to say it was an extremely successful outcome!  I did a little recipe research first and, after some mixing and matching, came up with the following:

3 cups whole wheat flour, one .25 ounce package yeast, 1 cup warm water, 2 tbsp shortening, 1 tbsp garlic powder, 1 tbsp basil

Mix ingredients in large bowl until dough forms, cover with towel and let sit for 30 minutes

Knead dough several times (easypizzacrusts.com said 6-8), then roll to the desired shape, size, and thickness

I then spread the dough on our pizza stone, formed the outer crust, and let my miniature helper assist with the toppings.  It baked for 25 minutes, and we should have let it sit for five before we cut it, but we were too eager.  Yum!  This is definitely a keeper, and we'll give it five stars because not only was it easy, it was really goood!

Here's where I have a confession to make, though, because for all our attempts at avoiding processed foods we used a pre-prepared pizza sauce (in our defence, however, it was an organic sauce from Muir Glen, who is known for their BPA free processing and canning), our olives came in a can (if anyone can tell me where to find black olives in any other way please let me know), the mushrooms came in a plastic container (again, I have yet to see mushrooms sold unfettered), and we used pre-shredded cheeses (albeit organic, but of course they'd been processed and packaged).  The more we try, the more we realize how much we have left to do.  At least the pizza was good.

Page 1 2 3