Recipes Categories

Entries in Desserts (16)

Wednesday
Sep162009

Butterscotch pudding

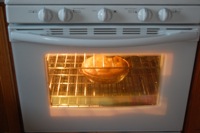
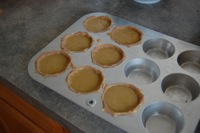
I remember with great fondness those nights in my youth when we had, sometimes for special occasions and other times for no reason at all, special desserts after dinner.  I'm sure there were lots of different nights and nearly as many different desserts (cheesecake and apple pie have to top that list) but the particular ambrosia that visits my memories with odd regularlity is pudding, made by my mom and served in little glass dessert cups.  It's a memory that conjures up feelings of cozy warmth and familial love, so today I recreated that slice of my childhood by making scratch butterscotch pudding for an after dinner treat.  It wasn't exactly the return to youth I'd hoped for, partly because I didn't have dessert glasses and had to resort to coffee cups, and also because my husband and son are so used to my stinginess when it comes to sugar that they treated this sudden onslaught with a slightly suspicious eye (Calvin is not familiar with bribery yet, but Jon is no stranger).

Speaking of sugar, I felt like the final product was a little too sweet, and next time I might see if I can do with less sugar.  Otherwise it was a successful endeavor, the only tedious part being the constant stirring.

Butterscotch pudding

Ingredients:
  ● 1/2 cup dark brown sugar, packed
  ● 2 tbsp cornstarch
  ● 2 tsp cornstarch
  ● 1/8 tsp salt
  ● 2 cups fat-free milk
  ● 2 egg yolks, lightly beaten
  ● 1 tbsp butter
  ● 1 1/2 tsp vanilla extract

Directions:
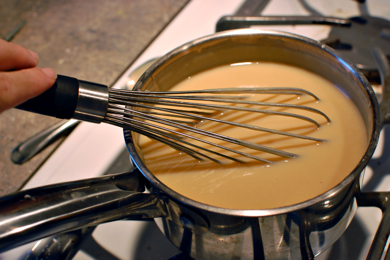
1. In a small saucepan, combine the brown sugar, cornstarch and salt. Add milk and egg yolks; stir until smooth. Cook and stir over medium heat until mixture comes to a boil. Cook and stir 1-2 minutes longer or until thickened.
2. Remove from the heat; stir in butter and vanilla. Cool to room temperature, stirring several times. Pour into four individual dessert dishes. Cover and refrigerate for 1-2 hours or until chilled.

Friday
Aug212009

Rustic Zucchini Bread

It's that time of year! Our zucchini plants are valiantly fighting powdery mildew (with a little help from their farmer–did you know that a 1:1 dilution of organic milk sprayed on the leaves after dusk does wonders for this ailment?), and are producing at an astonishing pace. I keep remembering last year when all we got was one armload of zucchini before the plants succumbed to the fungus that we are successfully fighting organically this year!

In any case, with so many zucchini on hand, how could I not make zucchini bread? I found a standard recipe online, which we tried as written first, then made it a tad heartier and healthier with my own variations, including substituing whole wheat flour for half the white, increasing the amount of nuts, and decreasing the amount of sugar. I was expecting the worst, but really it was beautifully moist and very flavorful. Better than the original, if I do say so myself.

Ingredients:

● 2 eggs
● 1 cup sugar
● 2.5 tsp. vanilla
● 3 cups grated fresh zucchini, skin on
● 2/3 cup melted butter
● 2 tsp. baking soda
● 1.5 cups whole wheat flour
● 1.5 cups all-purpose flour
● 1 tsp. nutmeg
● 3 tsp. cinnamon
● 1.25-1.5 cups chopped pecans

Directions:

1. Mix together sugar, eggs, and vanilla. Mix in the grated zucchini then add melted butter. Sprinkle baking soda over the mixture and mix in. Add the flour, a third at a time (I mixed the two flours together first). Sprinkle in the cinnamon and nutmeg and mix. Fold in the nuts.

2 Divide the batter equally between 2 buttered 5 by 9 inch loaf pans. Bake for 1 hour at 350, or until a wooden pick inserted in to the center comes out clean (check for doneness at 50 minutes). Cool in pans for 10 minutes. Turn out onto wire racks to cool thoroughly.

Tuesday
Jun022009

Strawberry rhubarb pie

Our organic order arrived today with lots of beautiful rhubarb, only I had no idea what to do with rhubarb. I'm not sure I'd ever had it before. So I made a pie. And since the order also came with strawberries, I threw a few of those in as well. Actually, quite a few. I looked up recipes and then made my own compiled version of those that I found, and wouldn't you know it? It was actually great. Jon said it was the best thing ever to come out of my kitchen (I'm still trying to decide if this is a compliment or not...), so here is what I think I did to make it...


Strawberry rhubarb filling (for 10 inch pie)

• 3.5 cups rhubarb stalks cut into 1/2 inch pieces (Trim outside stringy layer of large rhubarb stalks and remove any leaves.)
• 2.5 cup strawberries, stemmed and sliced
• 1 cup sugar
• Unbaked pastry for two-crust 10 inch pie

Preheat oven to 400°F. Mix the rhubarb and the strawberries with the sugar and let stand for 5-10 minutes (while you roll the pie crusts works well). Pour into a pie shell, then top with pie crust. Cut slits for steam and bake at 400°F for 20 minutes, then reduce heat to 350°F, and bake an additional 40-45 minutes longer. Cool on a rack.
Filling will be a bit runny if the pie is cut while it is still warm, but still really really good. If allow it to cool to room temperature, the juices will have more time to thicken.

I served this with homemade whipped cream - yum!


Pie crust

I tried this crust today and it was okay, but I like the crust I used with the pumpkin pie last fall better.


• 2 1/2 cups all-purpose flour, plus extra for rolling
• 1 cup (2 sticks or 8 ounces) unsalted butter, very-cold, cut into 1/2 inch cubes
• 1 tsp. salt
• 4 to 6 Tbsp ice water

Combine flour and salt, then cut in butter using a pastry knife (or your good old fashioned fingers) until you have pea size pieces of butter. Add ice water 1 Tbsp at a time until mixture just begins to clump together. Place dough ball on a clean surface and shape into 2 discs. Be careful not over-knead. You should be able to see little bits of butter in the dough. Wrap each disc in plastic wrap and refrigerate at least 30 minutes.

Remove one crust disk from the refrigerator and let sit at room temperature for 5 minutes then roll out with a rolling pin on a lightly floured surface to a 12-inch circle, about 1/8 of an inch thick. Carefully place onto a (10 inch) pie plate and press down so that it lines the bottom and sides of the pie plate. Trim dough to within 1/2 inch of the edge of the pie dish.

After adding filling to the pie, roll out second disk as before. Gently place onto the top of the filling in the pie and pinch top and bottom crusts together. Trim excess, leaving a 3/4 inch overhang. Fold edges together and press, decorate with finger or fork as desired.

Sunday
Dec212008

Christmas cookies - two varieties

Such a cold day, only four days from Christmas, found us seeking indoor diversions today, so we baked.  Isn't that a rather traditional thing to do this time of year?  I'd found two recipes in our Penzey's Spices magazine that we had wanted to try.  The first is for cocoa cookies and, while they taste pretty yummy, they were a pain to make; even after over an hour in the fridge the dough was too sticky to successfully transfer from counter to cookie sheet with its shape still intact.  The second recipe is for no-chill cookies and that one worked like a charm!


Cocoa Cutout Cookies (thanks to Penzey's Spices)

Combine 3/4C sugar, 1/4C corn syrup, 1 egg, 1t vanilla and beat on medium until creamy.  Add 1/4C cocoa powder, 1/2t baking soad, 2/3C butter (softened), 2C flour, and 1/2t baking powder and beat on low until well mixed.  Divide dough in half, wrap in plastic, and refrigerate for at least one hour before rolling on a lightly floured surface to cut.  Bake cookies on an ungreased cookie sheet at 375 for 8 minutes per sheet.  Cool before frosting.


No-Chill Cutout Cookies (thanks to Penzey's Spices)

Mix 1C butter (softened) and 1C sugar until creamy.  Add 1 egg and 1t vanilla, mix until creamy.  Add 3C flour and 2t baking powder, blend well.  Form dough into a smooth ball and roll out on a lightly floured surface to cut.  Bake on an ungreased cookie sheet at 400 for 6 minutes.  Cool before frosting.


Vanilla Frosting (thanks to Penzey's Spices)

Combine 2C powdered sugar, 2t butter (melted), 3TB milk, 1/4t vanilla and mix until smooth.  Apply to cookies right away.  I made a make-shift applicator by rolling wax paper into a cone shape and filling it with frosting - a trick I learned umpteen years ago in Girl Scouts!

Friday
Nov282008

Yes, pumpkins were hurt in the making of...

Have you ever made "from scratch" pumpkin pie before? I looked online for recipes and found all kinds of great ones, each and every one of them calling for at least two cans of pumpkin. I'm not sure when canned pumpkin became a "from scratch" item, but with all the BPA warnings, and with a little time and a lot of curiosity on hand, I not only volunteered to make our Thanksgiving pumpkin pie this year, I opted to make it truly from scratch, meaning, that is, from a pumpkin. So I tried another online search, this time for "how to make pumpkin pie from a pumpkin," and I took the very first recipe that came up. It wasn't a fancy looking site, but the method seemed good, so Calvin and I shopped for our ingredients on Monday, and settled into the kitchen for an afternoon of baking on Wednesday (well, actually Calvin was settled into his bed for a nap and only I was scurrying around the kitchen). Turns out the recipe was relatively easy, and way better than relatively good, so now I'll share it with you.

I'll give you the rundown below, but The site link is here: http://www.pumpkinpatchesandmore.org/pumpkinpie.php

The only thing I did differently was to soften my pumpkin by cooking it on high in the microwave for 3 minutes before attempting to cut it in half (the site mentions using a hand saw, but I thought this was a better idea).

I got my 8inch organic pie pumpkin from Arbor Farms, softened it in the microwave (3min on high) before cutting it in half and scooping out the pulp.  I then cut it into small enough pieces to fit into my microwaveable dish (which, to me, means NOT PLASTIC, unlike the pictures on the recipe site), added an inch of water, covered it, and microwaved (again on high) for about 20 minutes (I had to do mine in two batches because it wouldn't all fit in the dish).

When done I was able to remove the skin by just lifting it off.  I then pureed the pumpkin using a hand held submersion mixer (great tool for this project!), and set it in the refrigerator for an hour while I made the crust (I used her recipe with whole wheat flour, but think my no roll recipe would work fine) and cleaned up the pumpkin mess. 

After pouring off any excess water I measured out 3 cups of pumpkin (I froze the remaining 2 or 3 - that was a lot of pumpkin!) and added to it the following:  1cup raw sugar, 1.5t ground cinnamon, 1t ground cloves, 1t ground allspice, 1/2t ground ginger, 1/2t salt, 4 eggs, and 18oz organic evaporated milk (which I found also at Arbor Farms - got to love them!).  I then mixed well with my hand mixer, poured into my waiting pie shell and slid it into the oven.  Just as she says on her site, man was it liquidy!  And boy did it cook up nicely.

Baking: I started it at 425 for just 15 minutes, then dropped the temperature to 325 for another hour.  She says to keep it at 350 for 45-60 minutes, though, and I might do that next time.  The usual clean knife rule applies here.  I also coated walnut halves with brown sugar and butter and added these to the top for the final 5 minutes of baking.  Also, I had plenty of leftover crust and dough, so I painstakingly made minipies in a cupcake tin (getting the crust in takes forever!) and added them to the oven for the final 45 minutes.  Not bad.

Sadly, I have no pictures of the finished pie itself, mostly its murderous beginnings, but hopefully you'll get the chance to make one and see it for yourself - yum!